

I drew a pattern in Illustrator based on an image I found in a book, then I located some thick cherry in my lumber stash, printed out the patterns full size, and made a plywood template for the curvy legs.
 I was all set to start cutting the legs because the decorative elements of any project are always my favorite, when I realized that it would be much easier to layout the joinery if the boards were square.
Whew. Disaster averted.
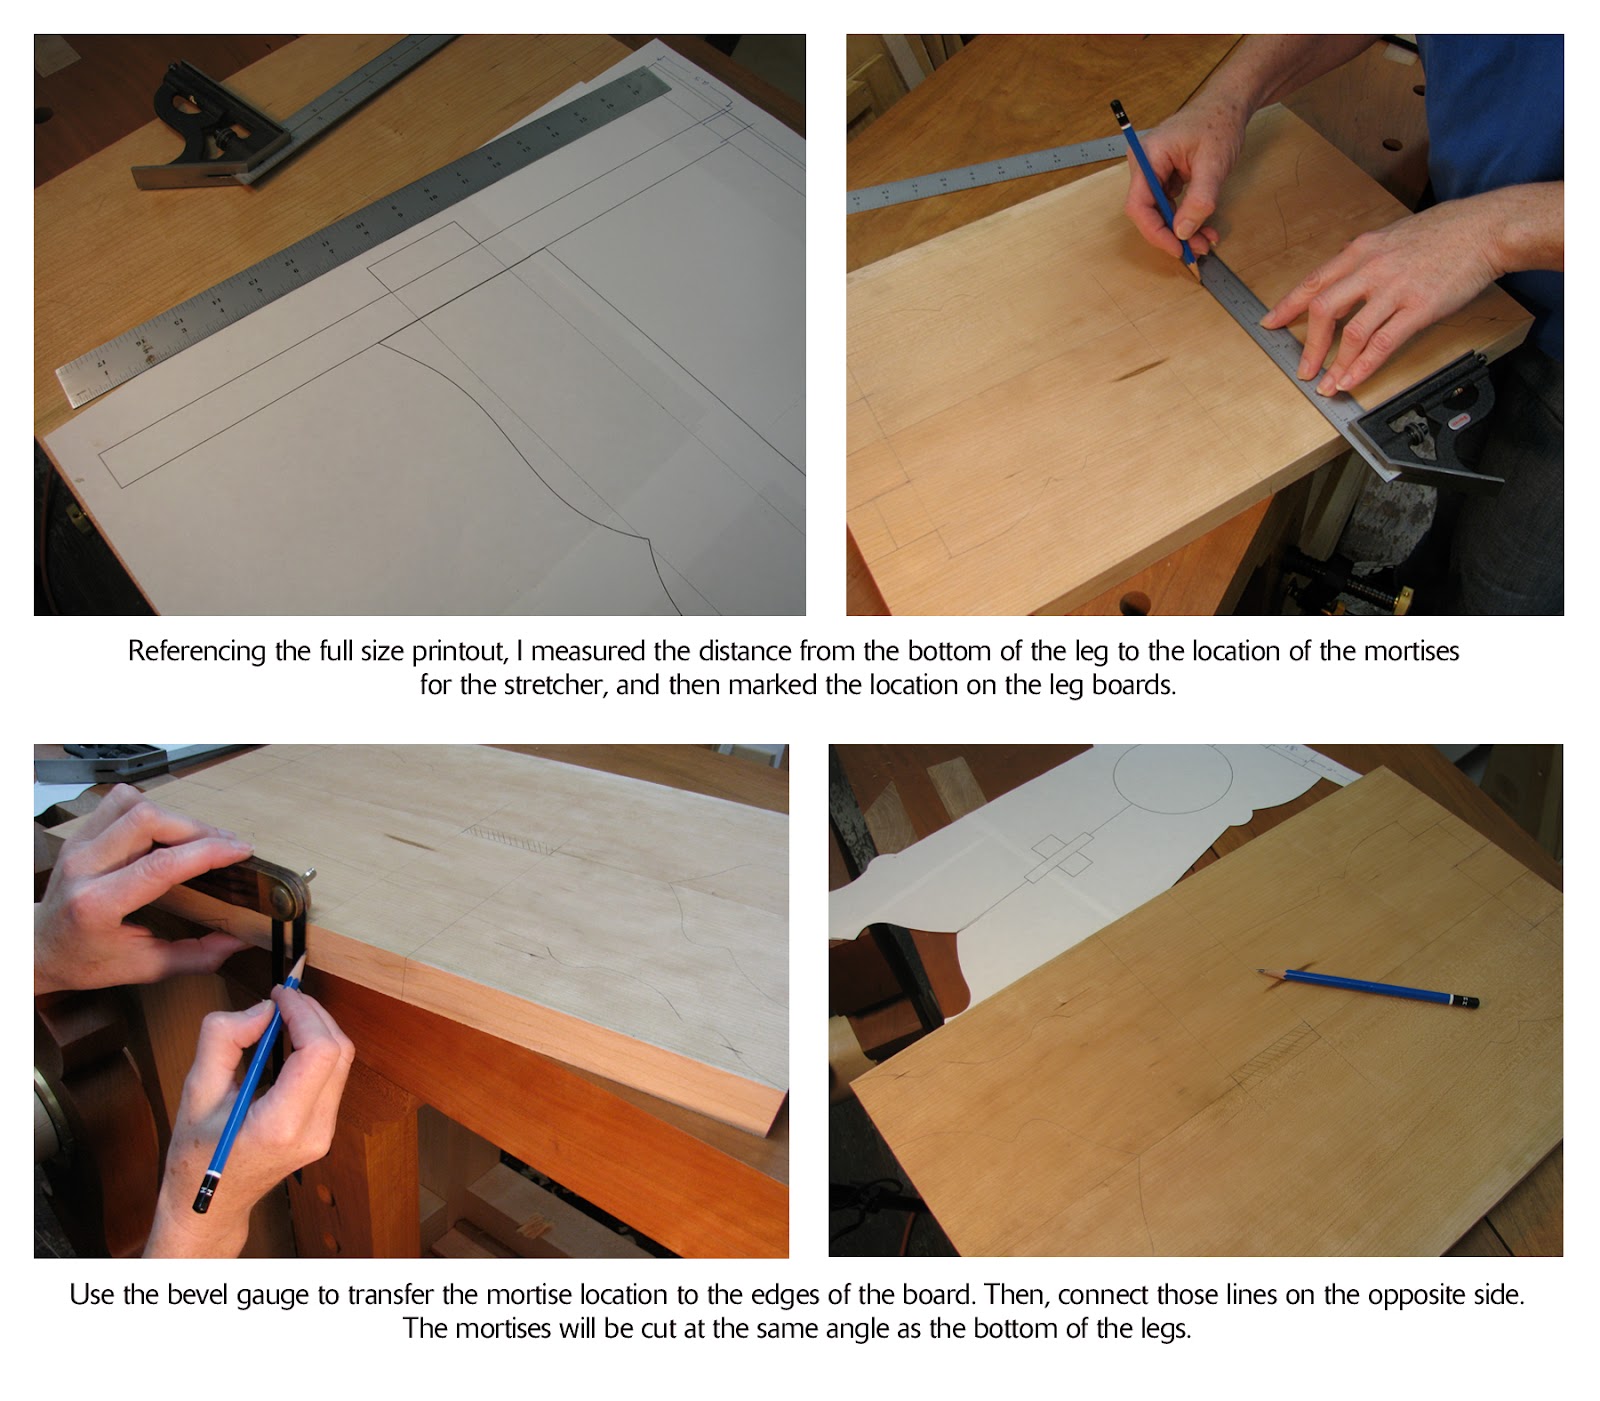
The benefit to working from full size patterns is you can take measurements right from the printout. And for those of us who are baffled by simple geometry, it makes it easy to determine angles.
 I drew a pencil line down the center of both leg boards and seat. This helped align the pieces when laying out the joinery.
 It's a pretty straight forward build. The one thing I did differently than the meditation bench was to cut the leg tenons first rather than the mortises just to see if it was more efficient and/or produced better joints.
 And the result of my in-depth experiment? I didn't notice a bit of difference.
Next up: cutting the stretcher and tusk tenons.

 |
| Those corners on the front of the legs will be removed when I cut the scrolly pattern. And the tenons will be sawn flush with the seat. |


17 comments:
You're a force, woman!! I can't wait to see your carving on that!
It's going to be tricky to carve because the cherry is pretty hard. I don't think a chip carving knife is going to work so I'll break out the chisels and gouges.
Yay! I found the another woodworker that uses Illustrator for their designs. Woohoo!!! :-)
Jonathan
========================
Great to see you sawing on Greta...how was it...?
Jonathan, Illustrator is great!
Douglas, Greta works splendidly. This is the first project I'm building with her. :o)
It looks great Kari. Be careful about talking about your saw bench in front of Greta. You might hurt her feelings! Looking forward to the carving too!
Kari,
In the pictures it looks like you used straight tenons at the seat and angled the mortices. Can you describe your approach to angled mortices? I have struggled with that. Im with you on chopping mortices on the saw bench; I find it much easier than chopping at the work bench. I chopped the through mortices for my springpole lathe (ala Underhill) on my saw bench and was much more efficient then boring and paring, or chopping on the workbench.
Can't wait to see the finished project.
Brent
Tom, that's a good point!
Brent, I forgot to mention that I'll saw the tenons flush with the seat eventually, so I just left them long.
Angled mortises are the same as laying out straight mortises except that to transfer the layout lines from one side of your board to the other means using your bevel gauge on the edges.
On the faces of your board, you have straight, parallel lines that are perpendicular to the edges. They represent the thickness of your tenon. The set of lines on one face is offset to the set of lines on the opposite face. The offset is determined by the bevel angle.
The last time I cut angled mortises (on the meditation bench), I made an angle guide from a block of wood to help guide my chisel. This time I just aligned the angle of my chisel with my bevel gauge that was sitting alongside my board.
The walls of the mortise that represent the width of the tenon (not the thickness) are 90º to the face of the board. Only the walls that represent the thickness of the tenon are at angles.
Kari,
You give new meaning to the question, "Just how many benches does a woman need?"
Can't wait to watch this one come together! :)
I also like that you use Illustrator, I use it or Sketch-up depending on the project.
Ethan, the answer is: however many can fit in my house. heh heh
Trevor, I'm not very good at SketchUp because I haven't spent much time with it. It's an excellent program, but since I work with Illustrator on a daily basis, I just use that. SU has all that great 3D perspective stuff, but I never build anything too complex, so 2D drawings work fine.
Looking at your tools in this picture, I'd say you've been in my tool box! The way you've documented this is exciting. Nice work on both the blog and the stool.
Your cherry must be harder than ours because shallow chip cuts work very well here.
Dan
hello, big fan
you do quite unique stuff.
i have a question about chip or relief carving plywood, a little info, its moulded in a gentle curve, from veneers of 1.5mm thick hoop pine, so all the grain is oriented in the same direction.
just wanted to get your opinion on suck matters as im a little worried about completely stuffing it up
forgive me grammar and spelling, seems the schooling system failed me
Dan, I tested my chip carving knife on some of this cherry and it's just too darn hard. I'll use my chisels and gouges instead so it will be fine. It's possible I don't have the finger/thumb strength to get that 60º angle in cherry with a knife.
Austen, I suggest carving a test piece of your laminated pieces to see how difficult it is to carve. Pine can be really nice to carve if the grain is subtle. Sugar pine is awesome and Eastern White Pine can be pretty nice. Pine with heavy grain can be more difficult. If you're carving beneath the top layer of wood, I'm not sure what will happen when you hit the glue in between the layers. Your carving tools will cut through it, but you might see a glue line as it passes from one layer to the next. Glue is also hard on tools, so you'll want to hone them often. Good luck!
Always, aways, always work to a full size 'rod' if possible...it makes a difficult job that much easier.
I'm interested that you use Illustrator for your design. I have not come across this program. Is it the same as Sketchup?
Rob, it certainly does.
CS, Illustrator is a program I use for my graphic design business. It is not at all like SketchUp. You could check youtube to see if there is a tutorial so you can get a sense of what the program does. SketchUp is much better if you need 3D type drawings that can be viewed from all angles. I never build anything too complex, so Illustrator works fine for my needs.
Post a Comment