 I've taken four classes taught by Tod Herrli at Olde Mill Cabinet Shoppe. With the right instructor, anything is possible.
This particular class was on making side escapement planes, and I came away feeling completely confident that I can make more on my own.

I took a class from Tod six years ago on making hollows and rounds, but this time, I made a thumbnail and an ovolo.
The soles were
 easy to shape because Tod had made mother planes (the negative image of the plane's profile), but they can be shaped with shoulder planes, hollows and rounds, gouges, sandpaper wrapped around a dowel, and/or router bits.
If you were to shape your own sole, you would need to draw the profile on both ends of your plane blank and then connect the lines across the sole of the plane. From there, it's just a matter of removing the waste material, however you see fit.
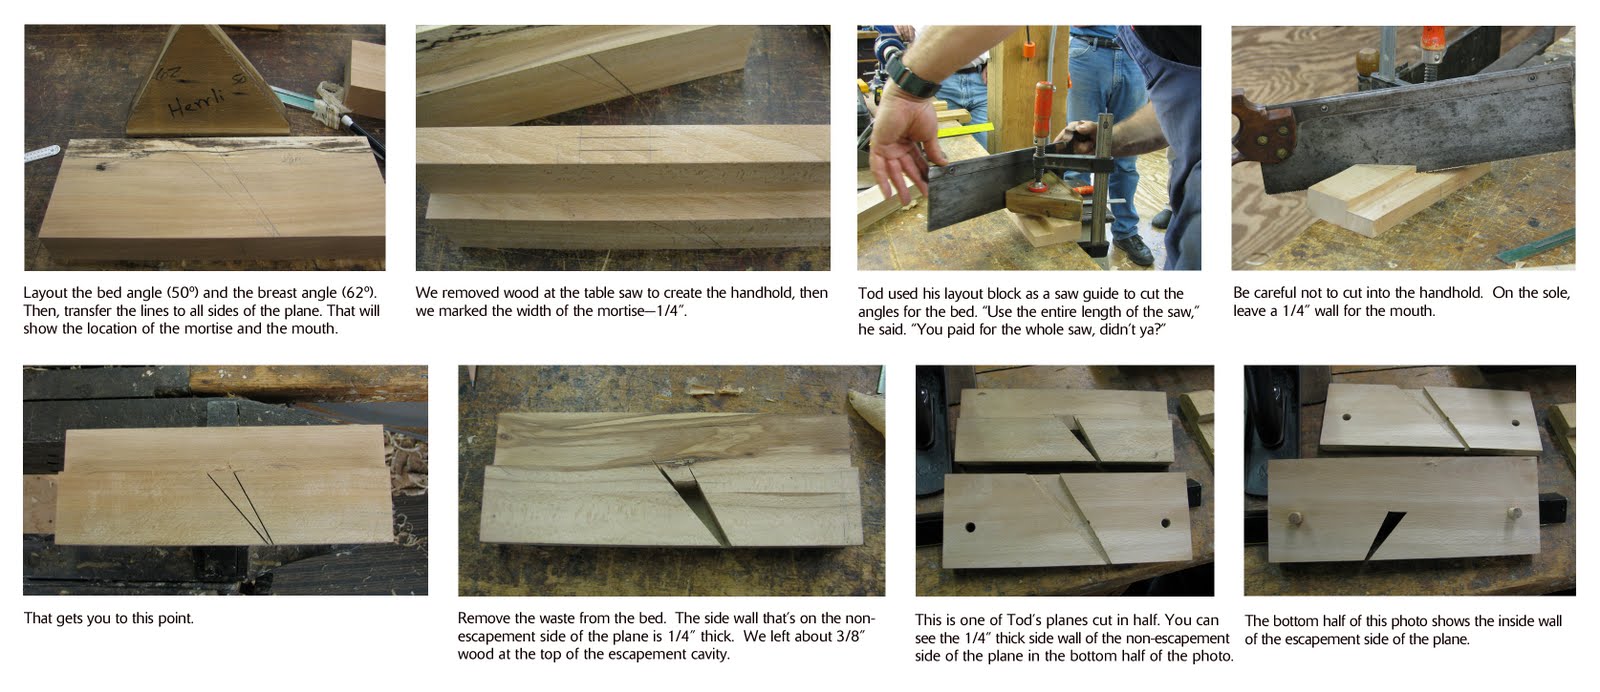
The photos show the order in which we made our planes, but here's a quick rundown:
1. Square up your blank.
2. Layout your lines.

3. Saw the handhold.
4. Saw the escapement walls.
5. Remove waste from the escapement with chisels.
6. Bore the mortise with a hollow chisel mortiser or chisels.
7. Use floats and chisels to finish the mortise.

8. Chisel the ramp that leads to the escapement.
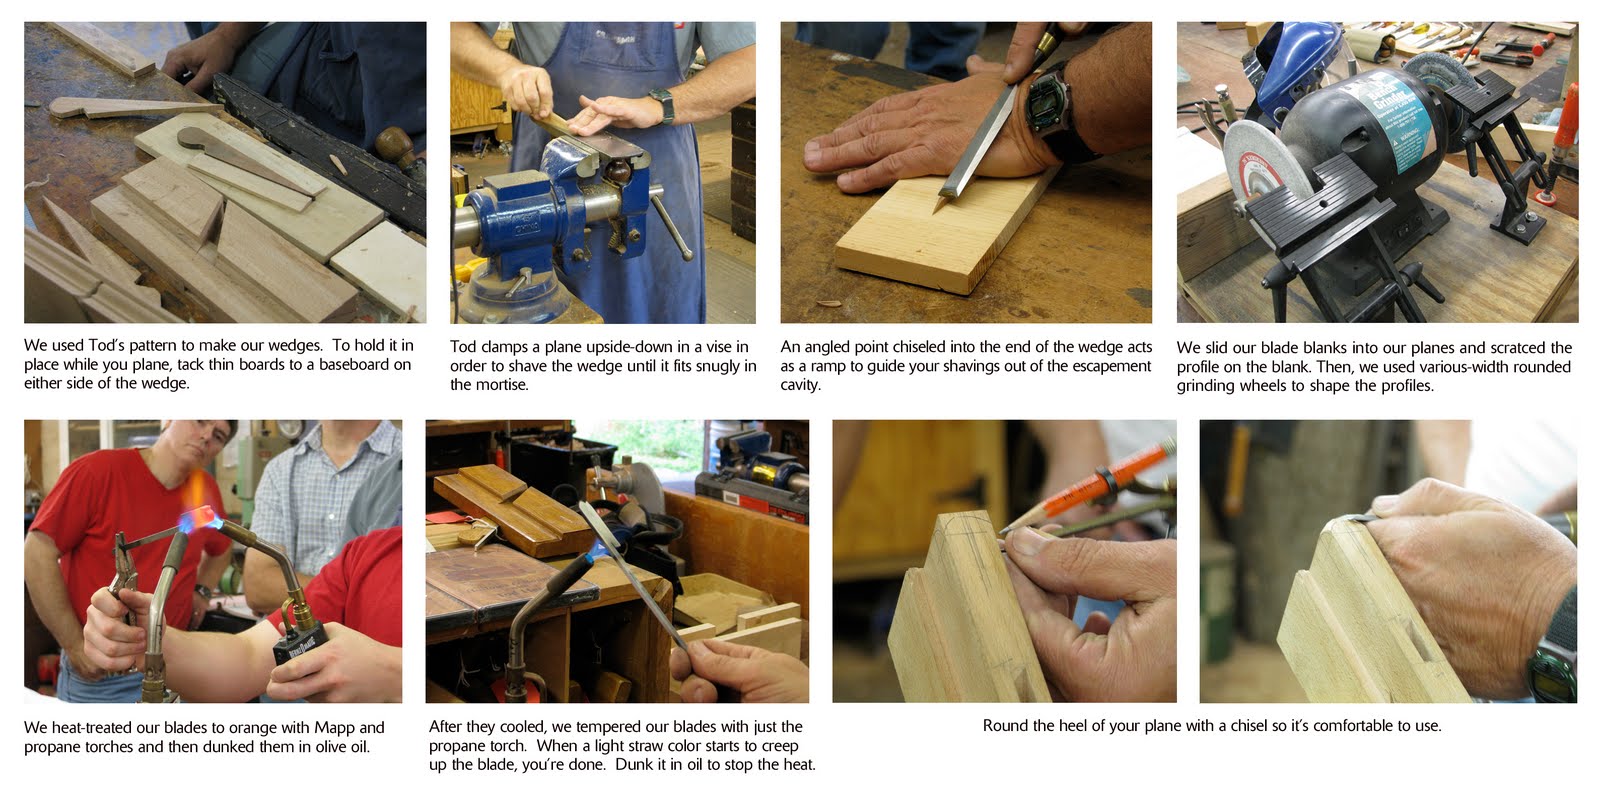
9. Make the blade.
10. Heat treat the blade.
11. Finish grinding and polishing the blade.
12. Make the wedge.
13. Add decorative elements to the plane (like chamfers).
14. Slap on some oil and make some shavings!
Sounds simple, and it is. But it can also be time-consuming, because there's lots of tweaking involved. Plus, you need to make sure that your blade matches the profile precisely.
But, Tod had some nifty jigs which sped up the process, and he was on hand to help us trouble shoot.
If you're looking to start making your own planes, I recommend Tod's video on making hollows and rounds. He shows you very clearly how to make them and how to heat treat the blades.
Your first couple planes may take days to make, but with practice, you'll be hanging up your Plane Maker sign in no time.
Here are my planes in action:


31 comments:
Very nicely done. What did you make them out of? Traditionally it's done with quartersawn beech but that's really, really hard to find in 16/4. Herrli recommends laminating 8/4 in his video, but Larry Williams is really down on laminated planes in general so I've never been entirely clear on what to do about it.
Great looking planes Kari. I've been waiting for this post as I was following your class progress on Twitter. Looks like the planes work great too. I just watched Todd's video about a month ago and have the itch to make a molding plane. I noticed on his video that Todd doesn't use tapered blades as Clark and Williams does. Does this pose any problems?
Jamie Bacon
gchpaco, we did use quartersawn, non-laminated beech, but I'm not sure where Tod got it. He talked about laminating and I remember Larry saying not to do that, but I can't remember why. Something about blocking moisture. With these thin moulding planes, I bet it's not as much of a problem to laminate pieces. But if you're going to make a coffin smoother or large plane, it might be different. I've made four Krenov planes, though, and they seem to be fine.
Jamie, you're right--Tod does not taper his blades, but I don't see that's it's a problem. I think that C&W tapers their blades so they always bed correctly. But it's pretty easy to seat non-tapered blades. Good luck making your plane!
Once again Kari, very nice work.
Those look great Kari, as always.
Quartersawn beech is really hard to find. Matt Bickford, another new planemaker, uses quartersawn cherry. I have a pair of his snipes bills, and they are great tools.
You can get tapered irons for side-escapement planes from Lie Nielsen. I don't think untapered blades make much of a difference, but I'd never taper one by hand again. The Lie Nielsen blades still need to be hardened after shaping, though.
Beautiful work as usual, Kari. The video is almost as fun to watch as it is to plane! I love the soundtrack!
All the best,
Doug
Lovely planes Kari. There'll be no end of custom mouldings on your work now!
Excellent post Kari! Making the blades is what scares me about this. I have a couple of profile plane bodies but have never got around to making the blades.
Thanks, Jonathan!
John, I wondered about Matt's planes but have never seen them in person. Do you think using cherry will affect the plane adversely in use? In other words, cherry isn't as hard as beech, so I wondered if the sole's profile would become altered over time. I will probably use maple if I can't find quartersawn beech.
Thanks, Doug and Jack! :o)
Samuel, is the scary part shaping the blades or heat treating them? Using rounded, various-width grinding wheels works great, but you can shape the blades with files and stones, instead. Heat treating is very easy, but it's easiest if someone shows you how to do it in person. Those would make good videos. Thanks for the ideas!
I don't get it... your bio says you're a full-time business owner. How on earth do you accomplish so much amazing woodwork "on the side"? It must be an important escapement.
Fabulous Kari!
I know I'm going to want to make some of these someday and you inspire confidence. Thanks!
A real "aha moment" for me was seeing that line on the end of the plane. Dang! I could put a mirror at the end of the bench and use such reference lines to get square edges.
And like Tico, I wonder how you get so much done. :)
Super cool, Kari. Well done!
Matt's planes are great. In addition to the two I own, I've seen the whole range at a show. I really don't think the cherry will impair the function at all. The snipes bills have persimmon "boxing," which is what Clark and Williams use. He offers it as an option for his rabbet planes as well. I have used curly maple for a couple of planes I've made, and it has held up well. But let's face it, all the use most of these planes will get in a lifetime in our shops doesn't really add up to much in the way of wear.
By the way, I think Matt beds his planes at 55 degrees. I have done 50 degrees myself, which seems to be what you are using. I'm tempted to try a rabbet at 55 or maybe 60.
Tico, here's how I do it: I work from a home office, I don't have kids, I have a supportive partner, and I ignore the weeds. ; )
Bob, using a mirror--what a great idea! You can definitely make these planes.
Thanks, Darnell. :o)
John, thanks for the info about Matt's planes. I hope he'll be at WIA so I can see them in person. I guess I was wondering if the cherry sole would get dinged or compressed, but you're right—probably not in our lifetime. I thought the same thing about the higher angle. Mine are 50º, but 55 and 60, also in a smoother, sounds like a good idea. These guys work really well in straight-grained stock--not sure what will happen with curly stock.
Kari,
Em and I met Matt at the LN show here in Maryland, he's a great guy, more than willing to talk about the ins and outs of what goes into making his planes, and he'll be at WIA. About using cherry, I had the same concerns as you, but he said he's used the planes he brought to the show to make all the planes he's sold, and I thought they looked pretty much new, and also beautiful but then I really like cherry. Still he mentioned wanting to switch to beech eventually because it's "proper".
Pete
Btw, great work on your moulding planes! I like your video, too. Matt showed me how to make an ogee which was the first time I've really used a hollow and round and even though it didn't turn out perfectly, it was addicting. :) I have Larry Williams' how to video and hope to put the knowledge to use someday soon.
Pete
Nice post. I enjoyed watching the video.
But I wanted to use the post to ask a question. I've never used a moulding plane, and don't know much about them. I’ve seen a number of sets of vintage molding planes at flea markets/antique malls. Can vintage moulding planes be reclaimed the way bench planes can? How much would be reasonable to pay for a vintage molding plane? What should I look for when considering buying vintage molding planes (if at all)? What types of problems should I anticipate anticipate? etc....
I'd welcome any feedback from the moulding plane users out there.
Beauties, Kari! Let's see Krenovian bench planes, hollows and rounds, and now moulding planes. I can foresee a trip to the Woodwright's School in Tarboro, NC to make a period toolchest to house them in. But wait! Then we couldn't see them! Yes, a shelf is much better. Then we will see them in your shop posts.
Your video clip makes using a moulding plane look easy. One of these days I'll have to pick one up (i.e., purchase one).
Love the vertical line on the end: never seen it before, it it's a tres clever idea.
--GG
Nice nice NICE! I got a supply of irons and set of floats back in the fall at an LN tool event, so I'm all set to follow Larry Williams' DVD to fill out my random collection of antique hollows and rounds. As others have pointed out, finding the beech is difficult, so I'll probably use cherry and maple for now. In a few years, my stack of apple will be ready to use.
I've also thought about checking with some of the local tree services to see if they ever cut any beeches. If I bought a log and rived it into billets, in four or five years I'd have quartersawn beech coming out of my ears!
hello kari
thanks for letting me participate in the making escapement side planes and congratulations on your masterpieces, you now have two new planes to add in your beautiful tools cabinet almost empty.
ciao Vittorio
Pete, I'll really look forward to talking with Matt at WIA and getting an up close look at his planes. I expect he will get lots of attention from show-goers. Using moulding planes is definitely addictive! Larry's video is excellent. I have his and Tod's and love them both.
mwh, you can fix up some moulding planes. I look to make sure the sole is co-planar in front of and behind the blade. I have seen some that are way out of whack. You also want a sole that's in good shape--not dinged up, cracked, or missing boxing. Check that the blade looks like you can still grind it. If it's pitted, I wouldn't buy it. Check that the blade's profile matches the sole's profile. Chances are it will be a little off, so you'll need to do some reshaping. Make sure the wedge isn't broken or if it is, that you can make a replacement. Hopefully some other people will offer their thoughts. It's a great question.
Joseph, ahhh, who doesn't love a tool chest? But yes, a shelf seems more practical. Just not as exciting. ; )
Travis/GG, I forgot to mention that the line on the toe is called the spring angle. It should be perpendicular to the face of your board in order to cut the right profile. Our ancestors were clever blokes!
Steve, apple is really nice to work with, but it moves a lot. Seasoning it for years is a wise idea. You will have a beautiful set of planes with that wood. If you do get ahold of a nice big beech log, don't forget about your buddies! :D
Vittorio, thank you!
Kari, can you tell me the dimensions of the plane blank? If so, is this typical for molding plane blanks or are some bigger depending on the blade type / configuration?
Thanks, Dean
Dean, here are dimensions for less complex moulding planes, including hollows and rounds. When you get to the wider, more complex moulding planes, the thickness of the handhold increases, but I don't know those dimensions.
The blanks for my planes are roughly 9.5" long x 3.5" tall. The handholds are 3/4" thick and thickness of the rest of the body—the part with the sole—is determined by the width of the profile. Because the tangs are 1/4" wide and the handholds are 3/4" thick, the walls inside the mortise are 1/4" thick.
I *think* planes made in the 18th-century are the longer ones—9.5". Planes made in the 19th-century in the U.S. are shorter—more like 9". I'll tap on Bob Razeiski's shoulder to see if he'll add to this thread. He knows way more than I do about antique planes.
Kari,
Fantastic job on the planes! You should get years of enjoyment from them. There is really nothing more enjoyable (to me at least) than seeing a beautiful molding emerge from a straight stick while using these planes.
Since you asked, I'll add a few thoughts. Regarding the tapered iron, I actually agree with Larry Williams on this. While the planes will work with a parallel iron, a tapered iron is an improvement. The act of planing causes backward force on the iron. With a parallel iron, the iron can slip back as the only thing holding it in place is the friction between the wedge and bed. However, with the tapered iron, the taper resists the force of planing. What this means is that the iron can be fixed in the plane with less wedging pressure, causing less stress on the wedge and plane body. However, I do think the difference is minor, and as you've noted, parallel irons can be made to work just fine.
On buying old molding planes, I've found it's sort of hit or miss when buying online. You have to expect to end up with some dogs, but the price is right. Buying from antique stores or flea markets is a better bet because you can actually inspect them before buying, but the drawback is that the selection and availability is limited in most areas of the country. I've had good luck with ebay, but I've bought some worthless examples from there as well. I look at it as part of the hunt for a good deal. You can buy one good new plane for a couple hundred, or two to four old planes for $75-$100 to get one or two good users.
When I'm looking for molding planes, there's a few things I look for. First is to make sure the wood is solid and not dry rotted. This can be hard to do online and I've gotten a few that were irreparable because of this. Minor chips or crack are ok if you are comfortable reparing them. Broken wedges can be remade or repaired. I use the wood from old dog planes for this purpose. Irreparable planes are a good supply of old beech.
Often, the soles of these old planes will be slightly warped or not coplaner as you mention above. This actually isn't a difficult fix with a little sandpaper and a dowel or "fid" that matches the profile of the sole. Also, irons often don't match the profile of the plane because of plane stock shrinkage or a ham handed sharpener. Again, this can easily be fixed with a little sandpaper, a few dowels, a chainsaw file and a lot of patience.
I think the most important things to avoid are planes with significant dry rot, moisture damage (usually easy to tell by water stains in pictures), significant cracks in the body, bad warpage, super wide worn out mouths, and significant pitting in the back of the iron. Most other problems can be repaired with a little patience.
Thank you Kari for the dimensions, and thanks Bob for the great information you added to the post.
So, correct me if I’m wrong, but if I purchase some 8/4 by 4 inch wide quarter sawn beech and cut it to a 9 1/2 inch length (plus a little longer for waste), I should have a starting blank that I can trim to a final dimension of 2” x 3 1/2” x 9 1/2”. I realize that with a more complex profile that the blank thickness may need to be more like 12/4 but that’s a guess.
Bob, thanks so much for offering your advice!
Dean, yes, you have it right regarding the blank. You'll want to orient the grain so it's running downhill on the sole and also consider any defects in the wood. Keep them toward the top of the plane, in the handhold, and try to place them so they can be trimmed off. If you don't have Tod's or Larry's dvds, I highly recommend them. Feel free to ask more questions anytime. If I can't answer them, I'll bug Bob again. ; )
Thanks once again Kari. I looked up the two DVD's you recommended, and noticed that Larry Williams also has a DVD called "Sharpening Profiled Hand Tools" (92 minutes). This was one of the DVD's listed on the Lie Nielsen site. It sounds like a valuable DVD to have.
Dean
Dean, you will not be disappointed.
Agreed on Larry's video. I am not the sort of person who learns from videos well and even I found it worthwhile.
Nice post. Just came across it. Thanks for sharing.
Post a Comment