"Quick" turned into "Unnecessarily Complex"—a phenomenon that all woodworkers can relate to.
 For example, I added quirk bead moulding along the edges with scratch stock (and had to make the scratch stock first). And rather than glue up four thin boards as a solid piece for the bottom, I decided to shiplap and bevel the individual boards.
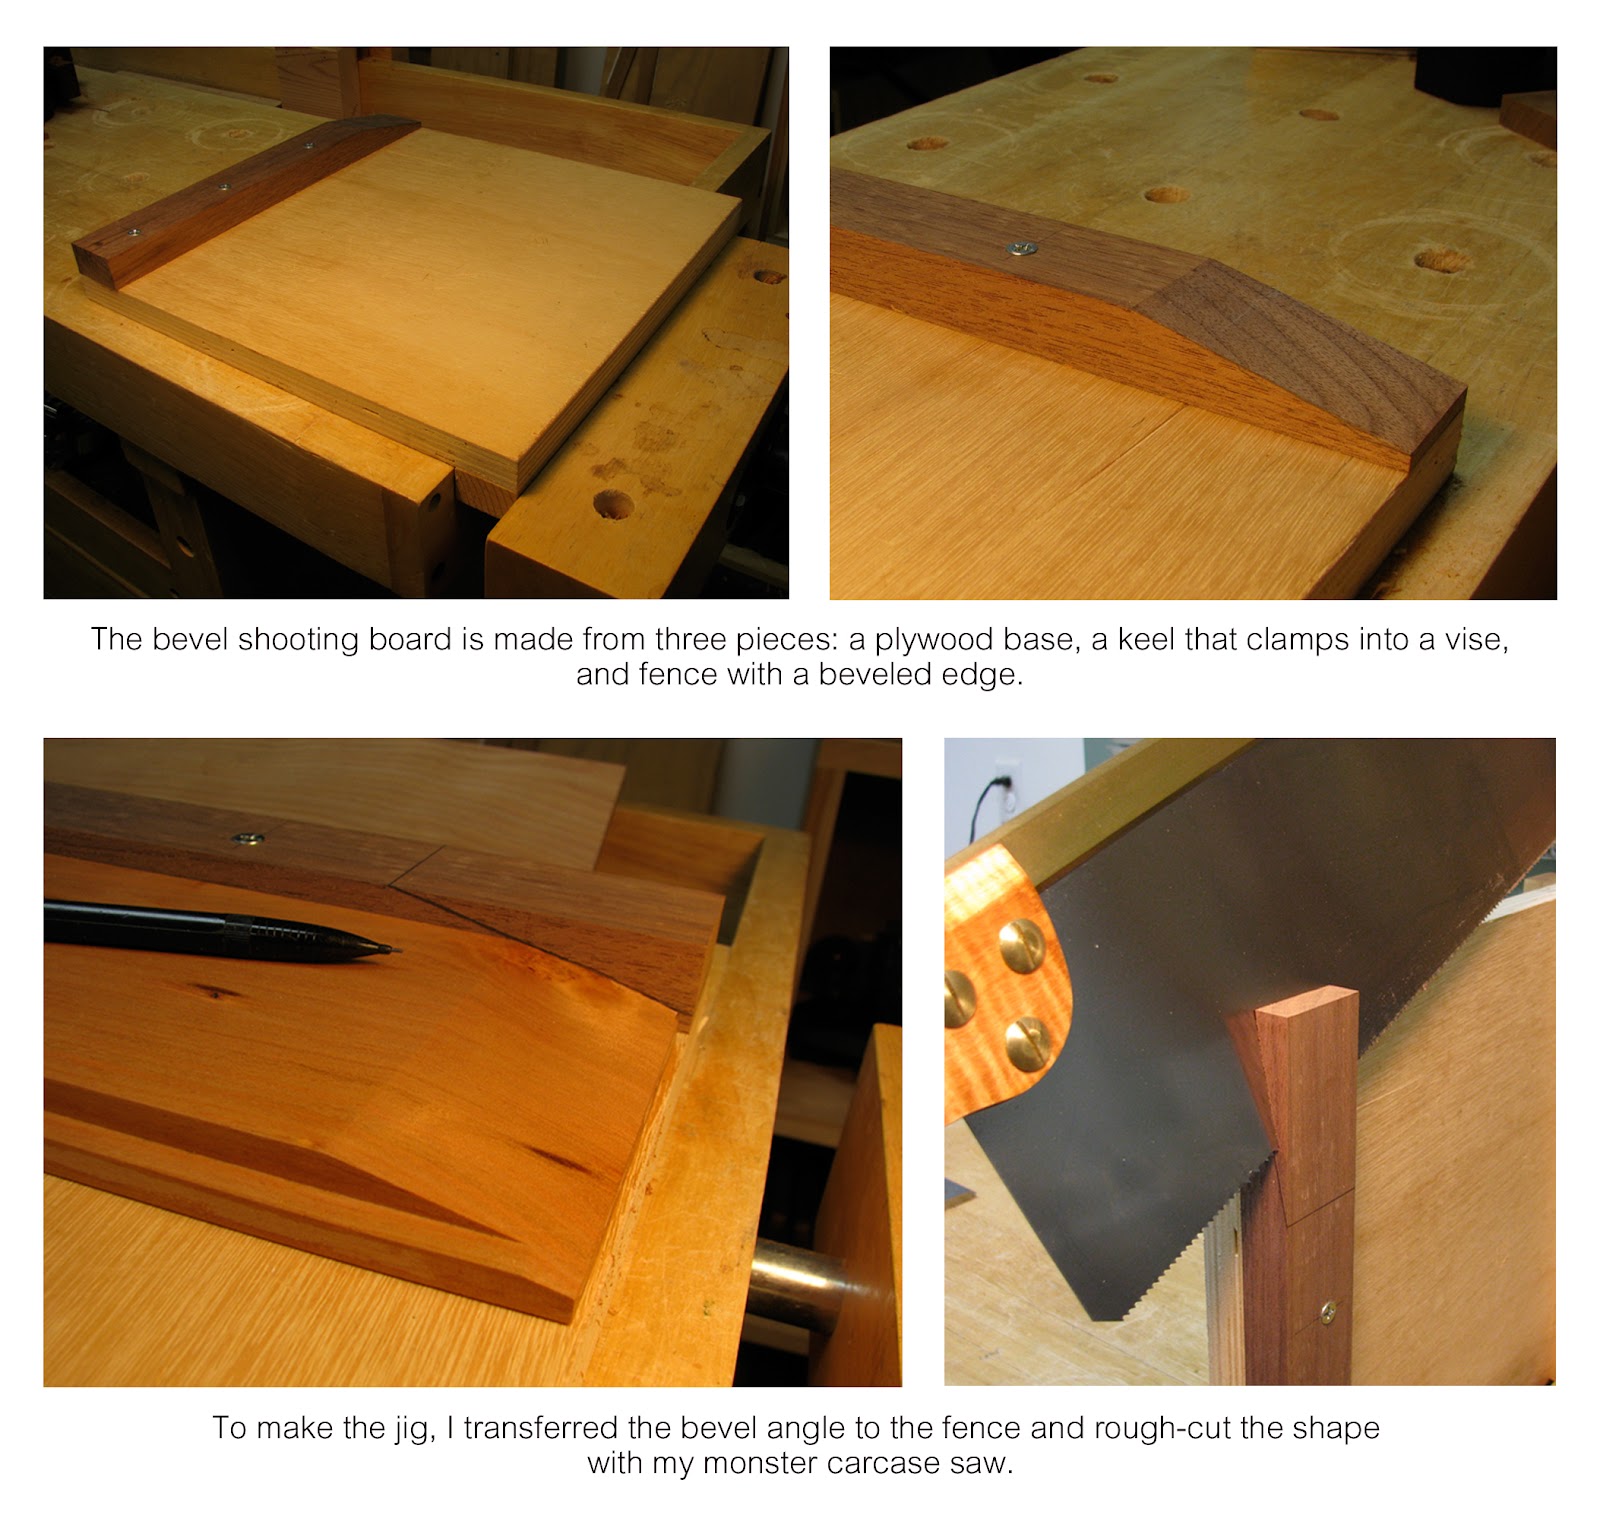 The four separate boards look okay inside the box, but the bottom looks a little odd. Either one glued-up, beveled board or two sets of beveled boards with shiplap would have looked nicer.
Finding a way to hold each board securely while planing the bevels was tricky. So, when I finished the boards for this box, I decided to build a shooting board so that the next storage box will move along more quickly (in theory).
There is nothing fancy or clever about my shooting board. It's comprised of three pieces: plywood for the base, scrap for the cleat, and squared-up piece of hardwood with bevel for the fence.

I used one of the boards that I had already beveled as a template for the fence. Then I used a carcase saw to remove the majority of the waste from the bevel.
I attached the fence to the baseboard with screws, and used a handplane to finish the bevel.
To use the jig, lay your workpiece alongside the fence with the ends aligned, and mark the bevel with a pencil. Transfer the marks to the top, sides, and front edge of the workpiece so you can easily see the waste area.

Use a handsaw to remove the bulk of the waste, then push the workpiece against the fence, and plane across the grain until you are close to your pencil marks.
At this point, slide the workpiece forward and plane with the grain until you reach your pencil marks.


19 comments:
So I assume the back boards are floating and not glued together which is why you beveled the boards individually. The jig ensures that they are all at the same bevel since you're doing them individually?
How'd the t&g plane work?
That's exactly right, Marilyn. I didn't have this jig when I beveled the boards for the first box. So it was tricky to get the bevels to match from board to board, let alone hold each piece to plane it. The T&G plane is groovy!
Soooo many bad puns .. and soooo little time! ;oD
Wow, what a great idea! I may have to give this a try on my next raised panel. I'm just finishing up plans for a writing desk and was considering them for the doors, this method would work great. Thanks for sharing!
Complicate a job is typical of great artists. Beautiful box and superb technique. It's unique. Very well explained.
Well written, as always, and well documented, what a resource you are. Just one question: What are you storing in said box?
Kari - what size is that LN bedrock in the photo? A #3? If so, how do you like it? I've got a 4 1/2 and its awesome, but I'm thinking maybe slightly long for my preference of smoothing planes. May try a #3 or so.
Rich, I'm glad it was helpful!
Ramon, I figured this was a universal "problem" we craftspeople have. :o)
Thank you, nr. I'm making this and two other boxes for my partner, so I'm not sure what she has planned for them. Probably just a place for some knick knacks lying around.
Morton, that is a 4 1/2 in the photo. I've never used a #3, but my low angle block plane (not pictured) gets used an awful lot. I basically grab whichever planes are sharp at the time.
You DO know you're my hero, right? I'm always amazed at your woodwork, your photos and your essays. Makes me want to get better all the time.
Nice work, really good idea.
And how do you get the blog to do the things you do? That voodoo. I can;t get my posts to shrink the pics, is there a demo or something somewhere...?
Vic, I've never had anything in FWW's readers' gallery, like you have. You're MY hero. :o)
CT Kelly, when you add a photo to your post and click on it (while you're still editing), a list of options shows up beneath the image where you can change the size of the photo, determine its placement on the page (right, left, center), and add a caption. I put groups of photos together in photoshop, however, and upload them as one image. Hope that helps.
Ohh, that helps, you photo shop the montage, thanks. never thought of doing it that way, clever girl. Nice blog, by the way, I;m sure you hear that all the time.
Kari,
First, always a well documented process and great photos. Thanks. I commend you for putting so much care into the bottom of the box. Usually the only tool that touches the bottom of any part is my Scrub plane. I am curious however, did you find that this bevel guide helped you make the bevels faster than just planing to your lines? Are you using the board like a miter jack to reference the plane sole against? I could see that the board would speed up the marking but couldn't a bevel gauge also do that? Especially since you are sawing the bevel first and assuming you saw to the line, wouldn't it be faster just to plane right down to the lines with the grain while the board is secured to the bench?
This is certainly not a criticism as results are all that matter, but I'm thinking about how I would incorporate this idea into my own shop and wondering how efficient it really is.
Morton, I love my #3. It fits a nice sweet spot between block plane and smoother for small projects like this.
Rich, you might consider a panel raising plane for a larger piece, or just a jack plane working to a line and rabbet plane to set in. I'm not sure this jig would work on a wider piece.
Now I'm going to hell for possibly questioning the brilliance that is Kari Hultman.
I'm a relative newcomer to woodworking, and still live the craft mostly through my mind's eye. Blogs, although I initially resisted (giving a hint of my vintage), have proved an invaluable learning tool for getting my mind whet. How did you learn the craft, Kari, and when did you realize your skills as woodworker?
Damn, this blog is getting to me. I am losing my way. Yesterday I flattened a large slab of red mulberry on my CNC, and today, while attaching the blocks that secure that newly flat slab to uprights to make a shelf, I noticed that one of the blocks was too long. I looked at my compound miter box - no, that wouldn't do the trimming, then thought about firing up the CNC and thought that was ludicrous, because it would have been, then remembered a bag full of handsaws I obtained when a friend closed down his shop - hmm - is this a job for hand tools? Got a small, high quality back saw out of the bag, and what do you know - that saw made quick work of making a too long block of wood the correct length. Not sure I had done work like that since junior high, back in '63.
Thanks, I think. ;^)
Thanks, CT Kelly. :o)
Shannon, all good questions. I built this with the intention of having a better way to hold the small boards while I planed the bevel, but it turned out that the fence supports the workpiece's bevel extremely well when planing across the grain to avoid spelching.
That's not really a problem if you're going to plane a bevel on the adjacent edge of the board because your plane would clean up the tearout. But in this case, I was only putting a bevel on the ends of two of the boards, so I needed to keep the long edges intact.
I planed down to very close to the line before sliding the board forward to plane with the grain on the final passes. So, in that regard, I did not use the fence as a support for the plane as you would with a miter jack.
I handsawed relatively close to the line, but had enough material left to remove that planing across the grain was necessary to speed things along.
I referenced the initial bevel mark off the jig's fence because I had to match that bevel in order for the jig to work. If you plan to use different angles of bevels, you can make other jigs, but I use this angle most often.
I made a panel raiser a few years ago, but it has a fillet and I didn't want the bottom boards to be that fancy. You can also use a shoulder plane (or rabbet plane as you suggested) to make the fillet, and then finish up with a handplane. I'm sure there are other ways to create the bevel--would make for a fun blog post.
Oh, and if you consider me to be brilliant, then you need to raise your standards! ; )
DJ, be sure to look around on my links page for other blog sites you might depending on your interests. I need to update the lists because there are a bunch more bloggers out there who are producing great content.
I started woodworking in 1992 when I moved into my house. There is an old workbench in the basement and the idea popped into my head that maybe I could build something. I bought a book on woodworking, and that's all she wrote. I had found my passion. I'm primarily self-taught, thanks to Norm Abram and lots and lots of helpful books, magazines, and websites.
Anonymous, hold tight! You are on the slippery slope of hand tool woodworking. :o) Sounds like you got some sharp saws from your friend, which is excellent. If the saw hadn't been sharp, you might not have realized how well they work. That's my beef with the saws they sell in the big box stores—they're useless and I wonder how many people have bought them only to be disappointed. Enjoy your new journey!
The saws are sharp, Kari - my friend got them from a good store and they are top of the line. In reality, I have used sharp hand saws all my life, but this was a sweet little dovetail back saw and it was perfect for the job at hand.
Just to be clear, and I appreciate how difficult it is to describe woodworking clearly in writing, the board I needed to shorten was already attached to the natural edge mulberry piece. I was lazy and didn't want to remove it just to cut it, so I sawed it in place.
Is this overcomplicated? Yes and no. A simpler design would certainly hold stuff just as well without the extra effort of making a scratch stock and a bevelled shooting board. But this was a chance to practice a skill that might have application in a future project. Kari also discovered something that doesn't work (i.e. "...The four separate boards look okay inside the box, but the bottom looks a little odd.") It seemed like a good idea on paper; but the reality didn't measure up. Best to make that sort of discovery on something utilitarian for the shop and not on a serious piece of furniture.
Post a Comment