Sunday, November 7, 2010

Extended Holiday


I'm planning to take November and December off from the blog.

It's been 3 years, 2 months, and 418 blog posts since I started it and there are things I need to do that I've put off during that time.

Vacuuming comes to mind. The dust bunnies have morphed into dust rhinos.

Yardwork is another. A machete makes a handy appliance as you navigate the terrain to our front door.

And there are other things I've neglected. Like home repairs, cleaning out my business files, balancing my checkbook. Flossing.

Plus, I want to put some thought into VC 2.0. Maybe things will look a little different in two months. Maybe I'll write about things other than handtools. Like ball bearings. Or knitting.

Who am I kidding. I hate change. Things will look exactly the same as how I left it.

Anyhoo. Happy Thanksgiving, Merry Christmas, group hug, and see ya next year!

Thursday, November 4, 2010

Harvest Days, Part II

Harvest Days at the Landis Valley Museum is the best traditional, hometown country fair I have ever attended.

Artisans in period costume showed patrons how things were made by ordinary people a century and a half ago.

It's a fantastic place to bring kids, where history walks and talks and shaves wood right in front of them.

Doug Shaw, who makes hayforks, rakes, scoops, ladles, and shovels, carved spoons at his shaving horse.

And Claire Garman, the on-site cabinetmaker, chatted with me in the woodworking shop.

As a young boy, Claire remembers visiting the Landis brothers on their farm and in the very woodworking shop where Claire volunteers today. "They were characters" he said of the brothers. "If they needed something, they just built it."

The Landis brothers were inventive, resourceful, and lifelong bachelors. And in 1925, they invited the public into their lives by turning their homestead into a museum.

During the two-day event, you can dance to live bluegrass music in the yellow barn and in front of the old hotel, eat homemade apple dumplings, ride in a horse-drawn wagon, watch pies and bread being baked in open hearths (and then sample them!) and tour the historic buildings on the 100-acre farm.

I can hardly wait until next year.

Saturday, October 30, 2010

Hypothetically Speaking

Let's pretend that you've built a PA German sawbuck table, and the last time you knocked it apart and put it back together, the top refused to slide onto the rails.

Rather than waste time trying to figure out what might be wrong, because it had never given you trouble before, you reach for your mallet and persuade the table top to slide home.

*Snap!*

That was the sound of the dowel portion of two spindles—which hold the rails to the leg assemblies—breaking in half.

No wonder antique sawbuck tables are frequently missing their pegs; impatience is not a character flaw exclusive to the 21st century.

Upon discovering that the ill-fitting table top was the result of one of the leg assemblies having been inadvertently turned around while putting the table back together, you are faced with the task of repairing or recreating two spindles.

The dilemma is, you really, really, REALLY do not like to use the lathe.

So you decide to make new dowels by hand using a block plane to rough-shape the pegs, and a metal dowel plate to finalize it.

Photos one and two show a rough-shaped dowel and a finished one (in the foreground). Notice the smoothness and shininess of the finished dowel. You sanded and waxed it, right? Nope.

You discovered by accident that (after using the dowel plate—photo 4), if you tap the "wee-bit-too-tight" dowel through the peg hole a few times to compress the fibers, the endgrain that lines the hole burnishes the facegrain of the dowel.

You think to yourself, if you need for a dowel to slide easily upon removal, you can always bore a slightly smaller hole in a scrap piece of wood and tap the dowel back and forth through it to compress the fibers even more. (In theory, 'cause you haven't actually tried it.)

Now all you need to do is bore a hole in the handles of the two broken spindles and glue the new dowels in place.

But let's imagine that you haven't gotten that far and haven't quite figured out how to do it yet.

Hypothetically speaking, of course.

Thursday, October 28, 2010

Wednesday, October 27, 2010

Harvest Days, Part I

I've already marked my calendar for next October's Harvest Days at the Landis Valley Museum.

This was the first year we attended and it was worth every penny (and not just because Turkey Hill was handing out free ice cream).

During the two-day event, various 19th-century reenactors showed what life was like in a small country village.

It didn't take long for me to spot a woodworker—Jack Stone, the cooper.

Jack learned to make buckets and piggins using traditional methods from the John C. Campbell Folk School. Since then, he's been making coopered items to sell as a part-time business.

His butter carriers, which are lidded buckets (photos 2 and 3), have an interesting locking mechanism where one end of the handle is slid into a mortise, and the other end is locked in place with a pin.


Jack makes hoops from white oak or metal with brass rivets, and staves from sassafras. The wooden hoops take quite a while longer to make, but they add a certain homespun detail.

Check out the other photos to see Jack's unique ways to rout the groove for bottoms and shave the staves to final width. And check out his website to see a short video about his wooden hoops.

Tuesday, October 19, 2010

Googly Eyes

Why on Earth have I wasted money on cosmetics all these years when all I needed was a set of jeweler's magnifying glasses to make my eyes look bigger and my nose look smaller?

I started working on the little cooper carving and decided to invest in a pair of these* in the hopes that I could achieve a higher level of precision than my current capabilities. (That's the roundabout way of saying that my 46-year old-eyes don't see as well as they used to.)

The carving isn't much to look at yet, but the progressive shots in the group photo give you an idea of the magnifying capabilities of the four lenses that are included in the box.

Powers of magnification include 1.2x, 1.8x, 2.5x, and 3.5x—more than enough for my use. A tiny light that runs on batteries will probably stay in the "off" position (unless I take up coal mining) because I keep a task light attached to my bench.

The headband is adjustable and comfortable, and the instructions are lots of fun: "Under sunshine, please do not put it at window or at the focus of combustibles."**

So far, I'm well-pleased with my purchase.

And, while I don't want to get so wrapped up in details that I never complete the project, I am hoping that the lenses will help me become a little more accurate.


Oh, and the other cool thing about these glasses? They add a bit of pizazz to my Steampunk ensemble.

-----------------
*Note: I am not advertising for this company and I do not benefit in any way from sales of this or any of their products.
**I do not mean to offend non-English-speaking individuals. I think the turn of phrases within the instructions is charming.

There are other visors/magnifiers on the market, but these are the only ones I've tried. If anyone has had good luck with another brand, feel free to let everyone know in the comments.

Saturday, October 16, 2010

Jerusalem Mill

Jersalem Mill, a Quaker village established in 1772, is located in Maryland's Harford County.

Business partners Isaiah Linton and David Lee set up several grist mills along the Little Gunpowder River in the second half of the 18th-century. Buildings sprang up over subsequent years to create a village surrounding Jerusalem Mill.

A gun shop, located behind the mill, is believed to have produced muskets for the Maryland militia during the Revolutionary War. In later years, the building was used for coopering, housing, and rental space.

The blacksmith shop is across the street from the mill, a general store is just a short walk away, a springhouse is tucked away in a nearby field, and Jericho Covered Bridge is an easy quarter mile walk down the road.

A few other buildings in the restored village are privately owned and are not open to the public.

The mill ceased operations in 1961 when the property was purchased by the state of Maryland. It then became part of Gunpowder Falls State Park. Extensive renovations to the mill, gunshop, and blacksmith shop, all of which had fallen into disrepair, brought them back to life.

We visited the village on Colonial Craftsmen Weekend, where reenactors pitched tents, demonstrated traditional crafts, and sold handmade products.

I learned that walnut hulls cooked in water create a natural stain. Yellow is the easiest color to achieve with natural ingredients and green is the most difficult.

When making lye soap, the consistency is correct when an egg will float with just a quarter size section of its shell showing above the liquid.

And I learned that wax must be cooked at just the right temperature—not too hot and not too cool—in order for it to adhere to the string that's dipped into it to form a candle.

The two men who were working in the woodshop were very friendly and were happy to talk with another woodworker.
If you plan to visit, you can find Art Benser, the master woodworker, in the shop every Sunday, unless Christmas falls on that day.

Tuesday, October 12, 2010

Well, Shoot

Just when you think you know everything there is to know about shooting boards, along comes Ron Herman to show you just how tricky these jigs can be.

Ron owns Antiquity Builders of Ohio, a company that specializes in authentic restorations.

How authentic?

In his shop, tools are grouped according to the periods in which they were manufactured.

So, if your 1820 home needs some repair, Ron and company grab all their tools that were made prior to 1820 and then get to work.

According to Ron, because wood is not an exact material—it moves, shrinks, and expands (unlike metal, for instance)—the machines that cut the wood cannot produce a completely accurate piece. Wood needs to be tweaked in order for it to fit a joint, a corner, a mortise.

This is where shooting boards come in. If you need to make an adjustment in 1/4 degrees, you can do it with a shooting board.

Ron and his team mark their boards with the word "SAVE" because they are made from whatever scrap material they have on hand, which means they can easily be mistaken for trash. And when one wears out, it is trashed, and they make another.

To match an angle, Ron uses a bevel gauge to transfer the mark onto a shooting board, and then slides a nickel between the fence and workpiece to act as a shim. Most of his shooting boards have a nickel-sized hole drilled into the top fence which holds the "shim" for future use.

Ron prefers to use a miter box and shooting board to cut angles rather than a miter saw. "Cells are crushed with a power saw" he says, and crushed fibers don't hold glue well. Conversely, wood fibers are sheered with a handplane—pores are open, which allows for better glue absorption.

"You can shoot with any plane" he claims, as long as the side and sole are 90ยบ to one another. Ron uses a straight-mouth (not skewed) handplane for shooting and builds an upward-sloping ramp on some of his shooting boards to enhance the sheering action of the blade.

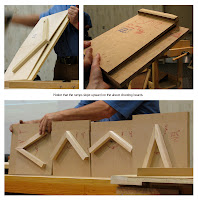
Many of his boards have dedicated angles (see first group photo). Others are adjustable.

One board (bottom three photos) is used to tweak tapered legs. Both the top and bottom of the guide are movable to accommodate a variety of shapes.

Shooting boards are made on-site for particular jobs—fitting a door, for example. Notes are written directly on the board for speedy reference. And scraps are tacked to shooting boards at various angles for quick "joint checks."

Do you need to undercut a piece of moulding by one degree? Take a look at the shooting board in last photo group. One chute (the bed on which the plane rides) is canted away from the workpiece and the other is canted toward the piece.

This is the overarching message I gathered from Ron's class: if you're interested in taking woodworking to a whole new level of precision, here's what you need—a sheet of plywood with a couple of nailed-on scraps, a well-tuned handplane, and your imagination.

I also heard the message "Sandpaper sucks." But that's another blog post.

Friday, October 8, 2010

Step Right Up and Feast Your Eyes


I want John Sindelar to come decorate my house.

I love this guy's style.

It's "19th-century gypsy" according to John, who has remarkable talent for creating Old World atmosphere.


As you step inside his trailer, it's like walking onto a theatrical set, or a turn-of-the-century carnival tent, or a Dungeons and Dragons game.

Visions of knights and castles, and medieval chambers transport you out of the real world and into John Sindelar's fantastic tool collection, only 1/10th of which was brought to the conference.

As you duck beneath the ornate and fringed tapestry to enter the museum, everything is cast in an amber and reddish glow.

Gilded frames house saws and braces. The 12'-long, floor-to-ceiling display cabinet (which he built in only 14 hours), is reminiscent of a Victorian train station.

Planes, axes (one, an enormous beheading axe), dividers—all ornately carved—are everywhere you look. Tools are suspended from the scrollwork pattern painted on the ceiling. An elaborate chair and tool chest, decorated with detailed marquetry, become display platforms for one-of-a-kind plumb bobs, trammels points, and measuring devices.

The lighting casts heavy shadows so that the wooden tools, with their rich, warm patina emerge from dark corners, like objects in a Caravaggio painting.

John is not only a high-end furniture maker, he's a carver, engraver, and painter. See the outside of his trailer? He and another man painted that.

Not only is his collection impressive, the man himself is worthy of praise.

Tuesday, October 5, 2010

What's New


I've only been home a short while from the WIA Conference and my thoughts are still in the marketplace.


As per usual, I spent a lot of time chatting with tool makers and other woodworkers.

Here are some of the new products that were on display and some of the people that I met for the first time.


I don't need to tell you that all of these toolmakers are top notch. Every single tool that was offered by them was finely-crafted and works exceptionally well.

When making a decision between which toolmaker to choose for chisels, planes, saws, etc., it often comes down to personal preference.

That's where having the opportunity to try the tools in person makes all the difference in your decision-making.

These are marvelous toolmakers. You simply cannot go wrong with any of them.

----------

List of Companies
(in no particular order):

Tools For Working Wood
Greener Lumber LLC
Bad Axe Toolworks
Brese Planes
Garbardi & Son
Vogt Toolworks
Noden Inlay Razor
Daed Toolworks
Knew Concepts
Blue Spruce Toolworks
Elkhead Tools
M.S. Bickford

Saturday, September 25, 2010

Artistic License

My friend, Dyami Plotke, sent a book to me entitled "The Artistic Crafts Series of Technical Handbooks—Wood Carving: Design and Workmanship."

It was printed in 1903 and focuses on relief carving—from choosing and sharpening tools to the do's and don'ts of the craft.

The author is very opinionated (alluding at one point to his distaste for a new trend in artwork which he finds to be without merit—presumably Art Nouveau) and points continually to older artforms created in previous decades as objects worthy of study.

I love this book. The man who wrote it, George Jack, and I would never have gotten along. His "this is the correct and only way to do this" approach would drive me nuts. However, the language he uses and his instruction are excellent.

It's motivated me to try relief carving again, so I spent time searching for a centuries-old print to use as a model. I found one on Peter Follansbee's blog which depicts a cooper in 1485, tightening the hoops on an inverted bucket.

The artist had a wonderful eye for balance, negative and positive space, and format. Your eye is first attracted to the face and the central spot in the drawing—his workpiece—then your gaze moves down the cooper's body to the axe on the stump, then circles to the left to view the bucket, and sweeps back up to the hammer. This circular shape is underscored by the arch in the doorway.

Upon closer scrutiny, the seemingly crude sketch (in ink, I'm guessing) shows someone who, with use of minimal line, is able to suggest heavy, thick folds in cloth, and who had an eye for detail of a craft which he did not thoroughly know. Check out the shaving horse. It has a dumbhead and footrest, but no bridge, and a gaping space in front of the dumbhead. Unless there was some insert (i.e., ramp or raised bed) that fit into the empty space, this shaving horse appears to be unusable. Plus, as Peter Follansbee pointed out, there is no front leg or pair of legs.

However, the artist does illustrate details like iron hoops hanging from the wall and a few of the tools a cooper would use. I was not able to determine two of the items on the rear table, to the left of his swinging hammer. One might be a cup because there is a pitcher nearby. The other looks like a pastry bag. Or corn cob. I opted to change those two objects to a drawknife and head shave.

Another thing I changed in my version are the parallel and horizontal lines. I used a plastic T-square and plywood triangle to square up the image. Those things can be fudged in sketches, but, to me, they would look sloppy in a carving.

What makes this a nice piece to use for relief carving is the perspective. As Mr. Jack explains, the rules of perspective that apply to painting are not the same as those used in carving: "...all such features [in the artwork] must be treated in a way entirely different to that adopted by the painter—that is to say, in detached groups, each having some due relation to the original surface of the wood, and only very little to their perspective positions."

He goes on to say that objects that point directly toward the viewer, in severe perspective, simply will not work in relief carving.

The artwork that I have chosen to carve reflects this concept. The elements in the workshop seem to be stacked on top of one another, rather than drawn in realistic perspective, and are in lateral and 3/4 view.

Now, let's see if I can do this wonderful little painting justice.